Wednesday, May 29, 2013

The Closet Came Out of the Laundry, huh?

It hasn't taken center stage but a VERY important part of our renovation is our new closet!


We converted the old laundry room into a closet.


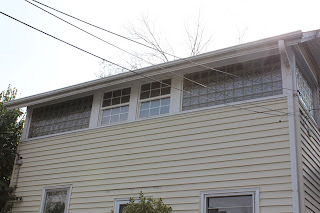
The old laundry room was in the left rear corner of the house. It had glass blocks wrapping the corner, just like the bathroom side. But, along the way the blocks on the back had been covered with plywood so shelving could be attached.

 
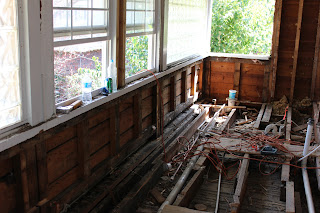
The glass blocks looked a whole lot better from the inside ...
 
 
than the outside! 
 
 
Plumbing for the laundry room had been run across the width of the house, cutting through floor joists. This made the floor a lit-tle spring-y! Yikes!
 
 
The new closet adds about 48 additional square feet of storage. It is on the exact footprint of the old laundry room. The glass blocks were removed, we closed in both sides of the house where the glass blocks used to be and added four new windows across the the back of the house. We chose Infinity windows by Marvin.
 
 
One of the windows, the one on the far right, is inside the new closet. 

 
This new closet gives us great storage with three hanging rods, a shoe shelf (bottom right) and a 36" wide shelving unit that runs from the floor almost to the ceiling. We used the same tile floor for the closet.


The sloped ceiling provides the perfect place for heels

Otherwise unused or messy storage space - perfect for additional shoes storage

When I worked on the space planning for this closet I did not realize
 we could fit in this shelving unit. It was a gift from Tye, the trim guy!
  Need to do some additional organization on the shelves...
 
I am soooo eager to show you the exterior of our house with the new siding and freshly painted trim but it's not quite finished .... don't give up! I promise it's coming!


Saturday, May 25, 2013

New/Old House Bathroom: DONE! Whoops - NOT DONE!

Just shy of 11 weeks, one house sold, one spring break, a bee sting, one long business trip, a birthday, a knee surgery, Mother's Day, two "kids" home from college, the sad loss of a family member, our first visitors (5 college students) and 70 days living in a construction zone ... NOW WE HAVE CROSSED THE FINISH LINE!  STILL NOT DONE! Boo-Hoo.

When I drafted this post I was certain we would be finished remodeling our bathroom by today but that didn't quite happen. But we are so close!

We still need the counter back splash, some touch up painting, a door knob, towel bars, and to top it off with some pictures, rugs, accessories and the window coverings (on order). So this feels a bit like I feel when I go out without makeup on: one part trepidation, one part impatience, one part determination. I know, I'm being ridiculous. I just wish I could SAY it is complete.  Anyway, here we go ... drum roll ... cymbal clash ...


Here is the path we've taken -


Detail photos to come ... 


Wednesday, May 22, 2013

From Gross to Glory!

After a long pause, I am happy that Mission:Foursquare is back! And so much has happened since I last penned ... pecked ... stroked ... typed? You get the point.

It comes as no surprise to my friends that I am long on ideas and short on skills! I am totally willing to learn, however. But, because I am a perfectionist about home stuff, I don't have much patience with myself.

So, it is empowering when I discover something I can do - and I can do well! Case-in-point:


Nearly all of the door knobs on the first floor of our new/old American Foursquare that was built in 1922 look like this one above. The knobs on the second floor are also glass but with plain brass sockets and no back plates. All of them have paint on them. Some more than others.
 
I was going to take all these to the Brass Shop in Hampton, Virginia and have them restored. As it turns out, the Brass Shop that used to be on Queen Street has closed.  But then, I thought, "I could do this?"
 
So, I looked online and I found this How-To on ehow.com. I was skeptical. You can really remove paint from brass just using baking soda?

What the heck? I followed the directions on one door knob and it's parts, as an experiment. You just put baking soda and water (4 tablespoons per quart of water) in a pan, enough to cover the pieces. Then boil for 30 to 40 minutes. I boiled mine for 30 minutes. Here is what it looked like when I took the pieces (from the picture above) out of the very murky boiling water:


After allowing the pieces to dry to the touch, I rubbed the parts with a wet rag and the paint just wiped off! Seriously!
 
Then, I had the pieces that looked awful - even worse than before. At this point, I wasn't even sure they were brass? Luckily, there was a container of Brasso under the kitchen sink. After some Brasso and some elbow grease ...
 
 
Viola! 


Here it is next to another door knob that I haven't polished yet.


The last step is to apply a coat of spray lacquer so the brass won't continue to tarnish.
By my count, I have restored one out of ten door knobs - but sooooo worth it! And, I have a new skill!


Saturday, May 11, 2013

Location, Location, Location

Back on March 17th when I blogged about Moving and Downsizing I tried to convey the difficulty of figuring out what to do with 1000 square feet more furniture than we needed in our new/old house. I spent a lot of time planning what to take, what to sell, and what to donate or pitch. I mean, I spent A LOT OF TIME on space planning before we moved. I pride myself on this stuff. I actually enjoy the planning part!
 
 
So it came as a huge disappointment, and a blow to my confidence, when this armoire (above), that I planned to be the main casement piece in our guest room, wouldn't fit up our narrow stairs. Disappointed it wouldn't fit, and disappointed in myself for not being the good planner that I thought I was.
 
 
So, one day when I was lamenting that I had to figure out what to do with the armoire, our handy-dandy contractor's assistant, Joe, said maybe when we replace the windows we could put it on the pump jack and put it through an empty window casing.
 
Now, in hindsight, I think Joe was just being nice and trying to lighten my mood. I, on the other hand, latched on to his idea like it was redemption for my poor planning.
 
Looking from the living room into the dining room. Just beyond the doorway on the left there is a stack of boxes.
The armoire came to rest beside that stack of boxes in the dining room. 

Fast forward to one day this week. I ventured out to do a bit of shopping after being down for several days recovering from my knee surgery. When I returned and parked on the street I noticed that a couple sashes had been removed from the guest room windows!

Command central after surgery 

"HOLD IT! Don't forget about my furniture", I said as I hobbled as fast as I could. I got blank stares from both Joe and Nate who were replacing the window sashes. "But, remember we talked about ..."

That's when it dawned on me that an innocent suggestion from Joe evolved into a solemn pledge, for me. I was counting on reversing my self-imposed loser status by moving that furniture! I must have looked pitiful because here is what happened next:

Nate and the armoire on the front porch. The whole episode was a bit Winnie the Poohish ... "Think, think, think."
 
Nate is now on the porch roof and he has enlisted the help of Shin, the siding installer and
Steve, the plumber in addition to Joe. The armoire is being pushed up the ladder like a slide.
 
The full weight of the armoire rests on Steve the plumber
 
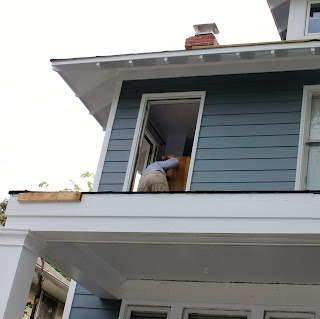
Up and over onto the porch roof
 
Whew! What's next?
 
 One, two, three ...
 
Soooo Pooh ... stuck going into Rabbit's house, "Oh, bother." 
 
 The plan worked. Unbelievable! 
 
Just how I planned! Redemption achieved!
 

Wednesday, May 8, 2013

The Word of the Day is ... Blue!

Don't forget to sign up for email notification!

Boothbay Blue siding by JamesHardie
The siding is almost finished and the installation of the new window sashes has begun. When we get a little closer
I'll show you the before and afters.
 
 
Sleepy Blue walls in the master suite and laundry by
 
 
After my paint color fiasco in our third floor bedroom, I am pleased to announce I am 2-for-2 on these color choices! We are still missing a door and the hanging rods, as you can see, for the new closet.
But, we're getting close.


Saturday, May 4, 2013

Top Down!

A note before you get started - you can now sign-up to receive Mission:Foursquare posts via email. Just put your email address in the little box on the left. There are a couple annoying steps but then you're signed up! Thanks for reading!
 
Just in the nick of time, we finished a kid's room! Well, it's mostly finished. Finished enough? Yeah, finished enough.
Top floor bedroom - fit for a prince!

I'm really proud of this room because we did relatively little and made a huge difference. Here is what we did:
 
1. The windows in this room were replaced with new ones. The old window air conditioner was removed and we had a hot air return installed to help the HVAC system work more efficiently.
 
2. "Clear the room." Isn't that what they say on TV? Yes, we moved all the "stuff" out or to the middle and we PAINTED!
     
This turned out to be a little more challenging than you would think. I am a home stager and I have an associates degree in Interior Design. In theory I am proficient at selecting paint colors, right? I am embarrassed to say, "NO!"

Right after Christmas I ordered the duvet cover for this room when it was on sale at a favorite place to shop, West Elm. Then, as soon as our offer was accepted on our new/old house I started looking a various paint colors including the one for this room. So, like a good Girl Scout I was prepared when we went to  Home Depot (I love their Behr Ultra paint with primer). Here is what we came home with:
 
 
I hope you can see what I am trying to show you -
it is a very lovely shade of lavender! Perfect for a young man ... Ugh! 


3. Second trip to Home Depot then completed painting the room this time.

4. Put the furniture back in place, unpacked the remaining boxes and cleaned the carpet.

 
5. Visited another favorite place, IKEA in Woodbridge, VA and purchased this awesome Mandal queen size platform bed.
 

I chose this bed carefully and for lots of reasons. First the size. Our son is 6'3" and probably still growing, so he really needs a queen bed or larger. This bed has no head board or foot board which is less confining for people with long limbs. And, the room is smallish with low ceilings so the low profile of the platform is great because it takes up less vertical space. The color is perfect because we already had all the other birch colored furniture, also from IKEA, that we used in another room in our last house. And, lastly, the Mandal has drawers providing us much needed additional storage. 

 
6. Put the bed together, filled the drawers and made the bed.

 
7. Accessorized.
 
  
One of our son's favorite things is this LeRoy Neiman poster, Golf Champions. Since the bedding, carpet and walls are neutral the poster is the color inspiration. I am using the most dominant color in the poster, green, as our accent color. I ordered the pillows from Wayfair, bought the basket at  TJ Maxx and I will gradually replace other items in the room with similar green ones.
 
Here is where we started:
 
 
Still to do: the window trim, window coverings and a new light fixture. We will also add roof vents for additional help with heating and cooling.
 
Top room down, several more to go. Progress feels sooooo good!
 
Paint color: Behr Ultra in matte finish, Wheat Bread, 720C-3


Wednesday, May 1, 2013

Bathroom Tile Grout: A Clash of Opinions

So, I promised you pictures of the bathroom tile? Here we go ...

Shower stall and floor of new bathroom. The floor tile looks wonky but only in the photo!
 
Let me say, right up front, that things are happening pretty fast and by next week we'll be ready for paint! So more pics to come!
Bathroom looking back toward the closet and bedroom door
 
Back to the tile. Last Friday I was doing some research at the library and, like a good doobie, I turned my phone off. Why is it that your phone hardly ever rings until you turn it off? When I left the library I had a long list of missed calls from our contractor. He was out of town and the tile installers had called him CERTAIN that they had received the wrong grout for our job. The installer said "we never use gray grout on white tile," and many other phrases like that. Hence, the multiple and somewhat frantic call attempts.
 
Back on March 19th I blogged about our tile choices in Bathroom Tile: Vintage with a Twist. In that post I told you how I was inspired by Nicole Curtis on DIY's Rehab Addict. She's a rehab rock star! She has often said that the small hex tiles for the bathroom floor and the white subway tiles for the wall are inexpensive and appropriate for turn of the century houses. What I didn't tell you is that she uses gray grout - on everything - always.


Why? Because in those days grout, as we know it, didn't exist. Tile was installed using cement because that was all they had. Cement is gray ... so gray grout. And, you have to admit, when you look at that photo above it definitely looks old school, right? Well, I guess you would have to be as old as me (not telling) or have been in an old house with the original finishes to know that? Additionally, the many, many grout lines in our 200 square foot space, will never look dirty! So after a short delay we were back on track!
 
At the end of the day, we were a little short on grout and two pieces of marble trim. No sweat, everything else can still move ahead! Yay!
 
Now, if the weather would cooperate we could get some new siding installed ...
 
 
Tile sources:
Floor Tile - American Olean, Ceramic Mosaic, Satinglo, Matte Ice White w/Black
Shower Wall - Daltile - Rittenhouse Square, 3 x 6 field tile (subway), Artic White semi gloss
Shower Floor - Daltile - 2 x 2 mosaic, artic white matte (maybe Permatones)